Well then

There are 3 reasons why you might be here.

You want to learn how to make chainmaille. In this case you should start with my basics guide. Or you saw one of my crossbow guides perhaps? Or you simply like awesome stuff of which I am a capable provider even if I say so myself. In this case, the popular posts section is a good start. This blog(and me) is very much active and I'd gladly help you out if you have question and so on. You can find me at email: bogy_shashav@abv.bg or skype: bogy_shashav


Have fun and enjoy your stay.


Showing posts with label plate. Show all posts

Monday, 14 January 2013

Voila, an acomplished lawyer.

Well not yet really. I don't even have my degree done yet and even after that i still got a lot of work to do. In the mean time its hammer time all day every day. Hammered out a pair of shinguards as the first project for 2013. I got more things in the works, but my arm needs some rest.


Sunday, 13 May 2012

Chain& plate armor 2nd set progress report 1

Phew, we are finally getting somewhere. The second set of turkish armour is closing completion.The set is already wearable and fairly comfy. I'm yet to close the sides, but I've made  progress on that, I simply ran out of premade links - the ratio between plates and chainmail in this one is more in favour of the chainmail than the plate mail. Still its not as if I don't have enough wire to wind into new coils. Here's the new armour as worn by me. The curve of the belly plate isn't that good. Not an issue in its own right, its just that it will always be slightly tilted to the right. Since I'm not going for looks, that's ok. After all I'm recycling old bits and pieces, can't be picky.


The set in its current state and full length - once i close the sides, I won't be able to display it like this again. Its about 4-5 kilograms right now, I'd say it will be less than 10 kilograms once finished which would be slightly less than a chainmail shirt of comparable size.


 Here's a close shot at the back

 And another for the front. The neck hole is quite big right now, I will probably tighten it later on. First things first  of course.  I need to close the sides of the armour with two strips of chainmaille, then think about the shoulders and neck.  I'd say short sleeves are in order here. A coif with a bigger mantle could cover the neck area decently too.

Tuesday, 8 May 2012

Chain& plate armor reborn

Oh boy its been a while since I posted about this project.

Well then, with the weather warming up, its back on track.


Not too much to show yet since its not yet wearable. I finished the front and most of the back. The belly plate has been coated to avoid rust. Once I'm done with the back, I can try it on. A far more...streamlined build than the previous one. There is less plate and more chainmaille but its going to be easier to wear and put on . Last one involved way too many straps...

Saturday, 21 April 2012

Plate armor Tip 1

Well I generally wanted to shy away from posts discussing proper plate armor, since i'm not doing any at the moment, but times goes by.

Now, today's post is again courtesy of maister Aule.

2 years ago he made a rather awesome winged helm for a buddy of mine.

It bears remarkable similarity to the steel plate armor helm from Skyrim, except there is no face plate.(Mind you thats from before Skyrim came out)


There are no pattern blueprints or full making process pics available or i'd give em. None the less there is something useful to be learned from here.
Thats two shots from the WIP on the helm.  The parts are shaped, the holes are drilled, however - they are not riveted yet. Its being held by bolts. Very useful if you have to make adjustments, which you probably will, with any custom project. Admittedly I hadn't thought about this before as with all simple and obvious things. It would have saved me a lot of trouble. So yeah - When working on plate armor with lots of riveting? Don't hammer out immediately, grab a bag of bolts first.

Sunday, 8 April 2012

4 in 1 japanese chainmail

Been a while since I made one of these clips :)

Right

4in1 japanese chainmail armour is quite simple, you can't really make a mistake in it. It lacks the density and strength of 4in1 european chain. On the other hand its lighter, and quite easy and fast to produce.
You can use one, or two types of links depending on preferances.

Here is several variants(one of them is from the video)


Wednesday, 21 December 2011

Chain& Plate armor Second serving

Right, now that the prototype is done and I got the basics of it, its time to start the new line of trendy and fashionable armor sets. I've started two at once to show my obvious dedication to hard work....Eh, excuse me, I need to trim my nose...Funny thing how quickly it can grow eh? Well actually its because I found parts that can help me start two at once.


Now this pair will be a little different, and that difference will be mostly due to an added belly plate. Recycling is the new rule of cool and while my own fashion sense is stuck around 1100 AD that does not mean I can't improvise, so yeah - I recycled those belly plates from what used to be kneecap guards. They don't look like much, having caught some rust and a bit misshapen since they were not planished, but for the current cause - it will do.


Whats important to note here however, is that unlike the simpler square plates used for the last set, these involve some actual hammering. Now I didn't plan to write about whitesmithing(no fire) so early on the blog so I'll just give a few basics.

The tools you will need here are above all - good hammers. Here you can see a ballpeen hammer you can probably find in the nearest handyman store. Next to it, is my own dishing hammer - I had it custom made for the job. The head is much less curved than the ballpeen. The ballpeen will still do if there is no alternative.
The other thing you'd need is a dishing stump. That could be an actual wooden stump with a oval hole on it, where you can shape the metal or you can use something else - like a sandbag. Right now I don't have a dishing stump, since my old one is now firewood.

Friday, 9 December 2011

Chain&plate Reasonable female armor volume 2

Ok the prototype turkish chain &plate mail is done, next ones are started already. All the basic ideas are set, I just need to get my lazy self to work.


Its not the best fit admittedly  its slightly too big for her. An arming doublet will fix that.


 OK, to sum it up. 

How to make one. First - the tools.
You need all the basic chainmaille tools  and material - pliers, cutter etc. to get the links.
You need a good drill - not the most expensive one but not the cheapest that will break in no time - you will be using it a lot. At least 2-3 spare drilling heads aint a bad idea. I broke one already.

You need either a throatless shear or a jigsaw to cut the plates. Another option which I've never explored is to get it cut by laser in some machineshop. Its available, and doable, but I've never tried it so I got no experience on the money involved and what you will get in the end. As far as I've heard the money depends on the number of cuts the laser does but I really can't say. If anyone tries this, tell me what you got.

Anyway, if its a one time gig, go for the jigsaw since its easier to get one and it will do, though you need to be careful with it - googles, gloves and basic safety folks! 

If its not a one time gig or you can get one easily - go for the throatless shear, yes I said it before, I will say it again. Those things are wonderful. The jigsaw is noisy(can't use in residential area) and you will need half a dozen discs or more since we are talking about a lot of cuts not to mention electricity  and safety gear. The shear involves more manual labour indeed - but seriously if you've picked this as a hobby you should not be afraid of manual labour. Its a bit slower too but apart from that its the obvious choice for anyone who wants to do more than 1-2 things because its a one time investment with almost 0 maintenance while jigsaw discs look cheap only until you've ran through 50 or more.


Finally you need sheet metal. There are many possible sources, for all its worth you can chop up a tin bucket. Just check that its around 1mm thick -too thin sheets won't do, too thick will be unnecessarily heavy and hard to punch holes into. I used left-overs & scraps from the workshop where they let us do our stuff, so its mixed gauges up there. Its not the best idea because of the previously mentioned piece of hardened steel that almost cost me my drill. Best option is to simply buy sheet metal from a warehouse. Thus you know what you are going to get. Of course that means a car to get it back home.

Tuesday, 22 November 2011

Chain&plate - Reasonable female armor :)

Or at least better than the battle thongs, and it still looks good.


Its much easier when you can find someone to try it on. Now I  need to close the sides with another set of plates. Maybe leave adjustable straps.but I might enclose it after all.

Friday, 18 November 2011

Chain&plate armor progress report 2


Right, just a small progress report here. I got shoulder straps and the back plates done. Its wearable at this point. I'm already making notes for the actual production model. The lower back can be covered with plates easily, that leaves only the 1/4 of the torso - the belly covered with maille only, and the 2 sides of course. Can't use scrap though, I'll need a big sheet for this, since, as I found out, a large quantity of similar plates will be better than several types&sizes. That means finding a car and so on...annoying.

Friday, 11 November 2011

Chain&plate armor progressing


Right, so that's a nearly finished frontal section, next i need to do the back, the shoulder straps and the sides. sleeves will be for the last. Ran out of sheet metal though.

Few words of advice here for those following in. Sheet metal will ****** cut you. Use gloves all the time. And you won't find it in the Tools4Us, you need a warehouse, unlike the wire.

Monday, 7 November 2011

Chain&plate - time for mass production

Recently I've started a rather big project here - making munitions armor - that is fast to produce average quality stuff from the "one size fits nobody" cathegory. While maille is good, its slow to make - a set taking several weeks to produce. I will need a whole year to equip a squad of 10. So I went on with something different, which is easier as a whole, though it takes a bit more instruments.


Chain&plate armor is made from small overlapping plates, joined together with rings. Its not dissimilar to lamellars, scale armor and brigantines, except that the plates here are held together by rings, not by rivets or laces. Its a typically eastern design, as the local reenactors from Chigot would say - "Turkish job".

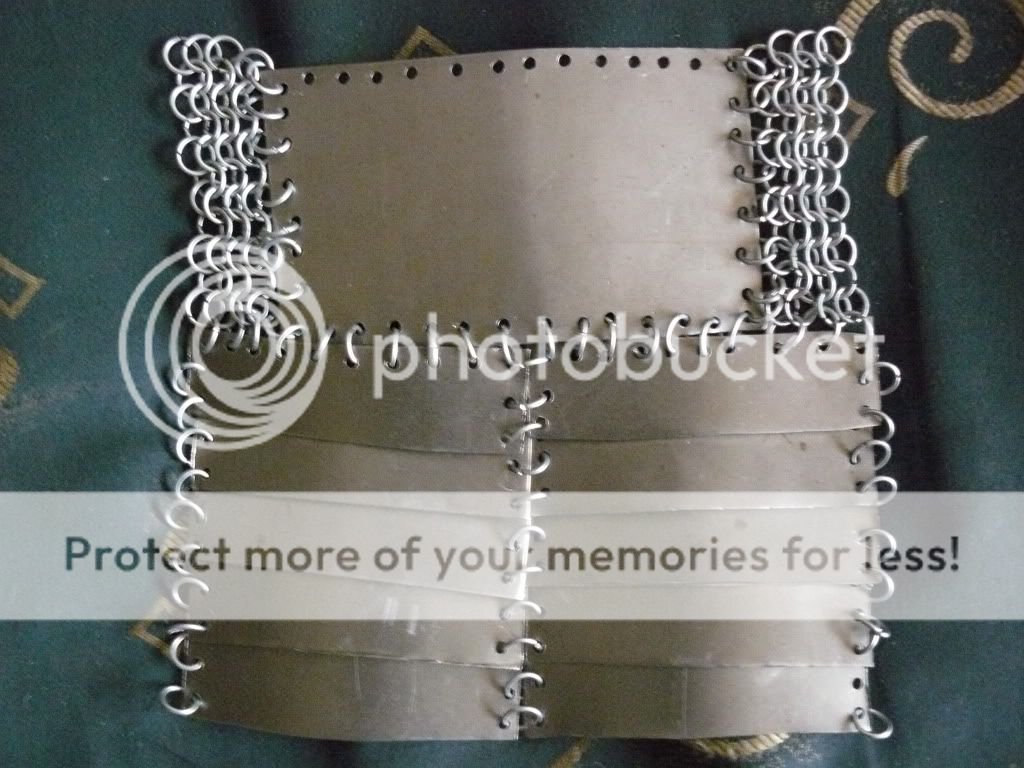
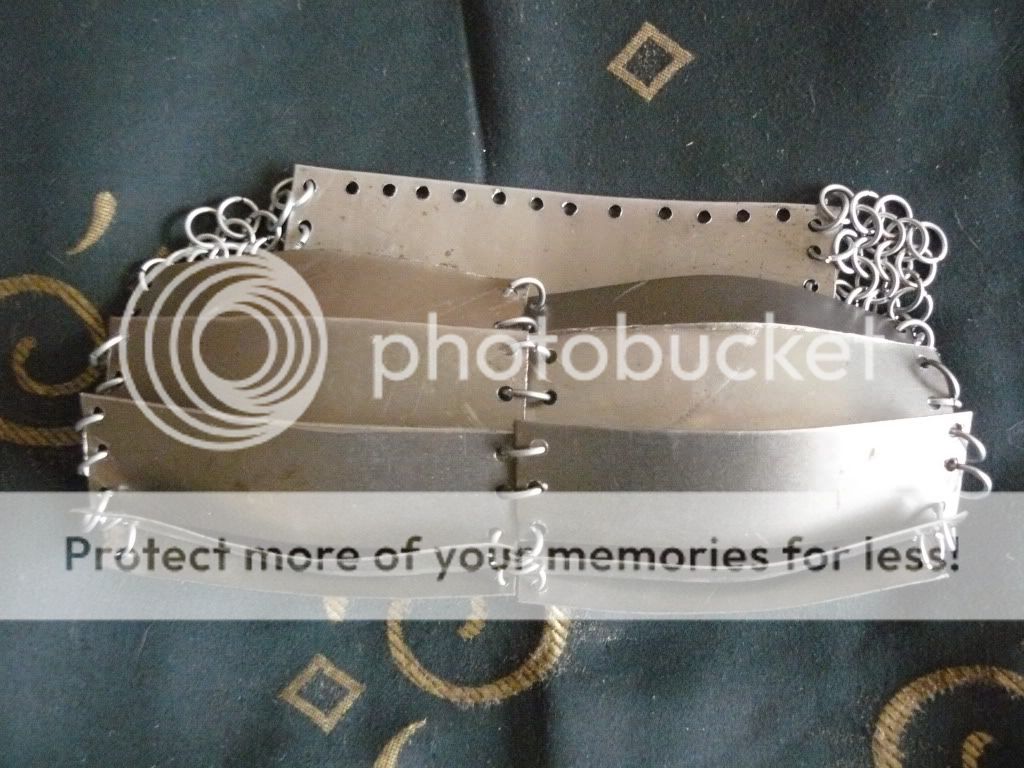
This here is a test piece made for about 1 hour and a half, hopefully soon to become the full prototype. Right now it covers the chest, and I will stretch it a bit more to cover the abdomen and then wrap with chainmaille. The full kit will look like a weird hybrid between a roman lorica segmentata and a lorica hamata.


Chain& plate is surprisingly easy to make requiring only a bit more in terms of tools and supplies. A drill is needed to make the holes,  and sheet metal of at least 1mm thickness for the plates. Even scraps will do as you can cut them up into small plates. To cut sheet metal, a throatless shear will be your best friend.

Here is what they look like:
Of course those are rare to find and expensive to buy so a jigsaw is an acceptable substitute.


Chain&plate armor is quite maneuverable and light too. It bends easily both ways. You have to pay a bit more attention of course - with maille worst that can happen is losing a few strands of hair - with plate you got sharp edges that must be filed away, and you should make sure its not close enough to your throat to actually cut you if you make a backflip or something.


Chopped up plates, ready for rust cleaning and drilling.

It terms of speed, it took me 1 hour to cut 30-40 plates from pieces of scrap, and another 1.5 to make 1/3 of a torso front by myself. With a couple of friends, it will be easy to make an awful lot of these.

Share

Twitter Delicious Facebook Digg Stumbleupon Favorites