Well then

There are 3 reasons why you might be here.

You want to learn how to make chainmaille. In this case you should start with my basics guide. Or you saw one of my crossbow guides perhaps? Or you simply like awesome stuff of which I am a capable provider even if I say so myself. In this case, the popular posts section is a good start. This blog(and me) is very much active and I'd gladly help you out if you have question and so on. You can find me at email: bogy_shashav@abv.bg or skype: bogy_shashav


Have fun and enjoy your stay.


Wednesday 8 August 2012

Damn heat wave

Its killing us, some more literally than others. Apart from that - well let's see. Exams done, court intern-ship done. Next week I'll have to shanghai someone with a car to help me restock our workshop with sheet metal. Mean while I finally got myself a god damn sword from the local reenactors. I must say...It feels good man.

Thursday 31 May 2012

Not dead - just finals

And by finals I also mean last year in university, so I'll be  100% busy for the next month, so no updates, sorry.

Still summer is coming.

Sunday 13 May 2012

Chain& plate armor 2nd set progress report 1

Phew, we are finally getting somewhere. The second set of turkish armour is closing completion.The set is already wearable and fairly comfy. I'm yet to close the sides, but I've made  progress on that, I simply ran out of premade links - the ratio between plates and chainmail in this one is more in favour of the chainmail than the plate mail. Still its not as if I don't have enough wire to wind into new coils. Here's the new armour as worn by me. The curve of the belly plate isn't that good. Not an issue in its own right, its just that it will always be slightly tilted to the right. Since I'm not going for looks, that's ok. After all I'm recycling old bits and pieces, can't be picky.


The set in its current state and full length - once i close the sides, I won't be able to display it like this again. Its about 4-5 kilograms right now, I'd say it will be less than 10 kilograms once finished which would be slightly less than a chainmail shirt of comparable size.


 Here's a close shot at the back

 And another for the front. The neck hole is quite big right now, I will probably tighten it later on. First things first  of course.  I need to close the sides of the armour with two strips of chainmaille, then think about the shoulders and neck.  I'd say short sleeves are in order here. A coif with a bigger mantle could cover the neck area decently too.

Wednesday 9 May 2012

Another Milestone reached and surpassed.

Looks like yesterday Drunkethics broke 400 000 pageviews. That definitely >9000. And its awesome. Popularity is one of the main things that keep me updating and posting all the time. So yeah -keep them coming.

Tuesday 8 May 2012

Chain& plate armor reborn

Oh boy its been a while since I posted about this project.

Well then, with the weather warming up, its back on track.


Not too much to show yet since its not yet wearable. I finished the front and most of the back. The belly plate has been coated to avoid rust. Once I'm done with the back, I can try it on. A far more...streamlined build than the previous one. There is less plate and more chainmaille but its going to be easier to wear and put on . Last one involved way too many straps...

Sunday 6 May 2012

Hulk's true identity

After watching the new Avengers movie earlier this week (its good, go watch it) something caught my eye. I could not quite get what it was - you know that feeling when you are missing something? Yeah.

And then it hit me. I finally recognized the Hulk for what he is.


Over 9000 hours of photoshop I swear!
He is the lost Primarch of the Angry Marines. It can be no other! Think about it: Hulk has the physique and size of a space marine Primarch, he most certainly has the abilities, and the psychological profile fits the Angry marines to the letter. That leaves another question. What about Banner? Isn't Bruce Banner the Hulk's creator? Nope - its the other way around :) Bruce Banner is the Hulk's creation - a feat of his psyker potential - an active camouflage of sorts - the Hulk laid dormant waiting for the Emperor to find him...but a certain someone's radiation therapy awoke him early.

After all - he said it himself... He is ALWAYS ANGRY! 

Saturday 5 May 2012

Battle of the Nations

Because you know, you need some place to bend all those tin cans, unless you plan on keeping them gathering dust and rust in some corner.


What IS the Battle of the Nations? Taking the name from that OTHER Battle of the Nations ,
its more or less an international medieval full contact combat tournament. Its not reenactment - more like LARP/SCA/WWF with swords and plate armor, but non the less - its pretty awesome in its own right. There are participating teams from half a dozen or more countries in several trials - 1 on 1, 5 on 5, full 21 on 21 etc.

There are teams from all over the world but the regulations and requirements are high.
 
For more info you can visit this Ukrainian site http://www.battleofthenations.com.ua/
It has english version as well.

You can also watch this short episode series on medievalists.net
http://www.medievalists.net/2011/11/11/battle-of-the-nations-tv-series/

Monday 30 April 2012

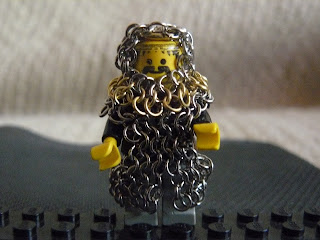
Lego armour version 3 finished with video tutorial

Phew! Its done. I finally sat on my behind and am now done with the lego DIY armour version 3. Gave me a headache but it was worth it.


USED MATERIAL: custom made links - 0.3mm rhodium plated copper wire, winded on 1.2mm dowel.

Since I do believe I've reached the maximum development possible for this project, I made a video tutorial on it. Its not the best, and well my camera isn't the best too, but it will do. Any chainmaille enthusiast will be able to catch up and get on with it in no time. For the rest - hold your horses, this is not for newbies. Do some easier stuff and then try to ruin your eyesight with this.


Here's the front in better detail.


 And the back.

Pimp my horse! 
 

 Here's the armor removal process. Its like putting on and removing a full sized chainmail hauberk, except the part where you remove the head first.  It has to be done very slowly and carefully. A stronger pull and you will open some of the links, and repairs on something THIS small can make you go nuts. (Unless you already are, like me)
 Armour removal process step 2
 And its off.

Here it is again compared with the lego armour version 1. 

Saturday 28 April 2012

Shortage of recent updates.


Sorry my bad ^^. Been a little busy recently. Still I'll probably have something good to show in the next 2-3 days, now that I have some free time. Final exams are coming and its the the current thing eating my nerves. Oh well, can't escape them right?

Saturday 21 April 2012

Plate armor Tip 1

Well I generally wanted to shy away from posts discussing proper plate armor, since i'm not doing any at the moment, but times goes by.

Now, today's post is again courtesy of maister Aule.

2 years ago he made a rather awesome winged helm for a buddy of mine.

It bears remarkable similarity to the steel plate armor helm from Skyrim, except there is no face plate.(Mind you thats from before Skyrim came out)


There are no pattern blueprints or full making process pics available or i'd give em. None the less there is something useful to be learned from here.
Thats two shots from the WIP on the helm.  The parts are shaped, the holes are drilled, however - they are not riveted yet. Its being held by bolts. Very useful if you have to make adjustments, which you probably will, with any custom project. Admittedly I hadn't thought about this before as with all simple and obvious things. It would have saved me a lot of trouble. So yeah - When working on plate armor with lots of riveting? Don't hammer out immediately, grab a bag of bolts first.

Wednesday 18 April 2012

Mini medieval crossbow model

Again with permission here's another of maister Aule's works. Following the same design and steps in his 15th century crossbow guide he made a miniature version. Photo quality is a bit bad, but you can see what's what on the big crossbow guide.


Here it is, half way through assembly - the wooden parts are carved out already, same goes for the lever and nut.
 Close shot of the body.
 Another shot of all the parts before assembly.
 Here it is, there is just no string attached yet.
Close shot of the trigger lever and nut.

 And finally the finished mini medieval crossbow next to a Nokia.
Here it is loaded for bear.
 
 And here it is test fired on a Suchard chocolates box. I wonder if there is a deeper subtle message in here? We might may never know.

 As you can see, its the bane of all chocolate boxes.

Sunday 15 April 2012

Happy Easter

Happy Easter everyone, I hope you are having the same cholesterol filled, artery clogging time as I am.
:) Going to take it while it lasts. Its exams session after that. And I have to write a letter to the European court of human rights in Strasbourg as an assignment from my intern job. Ah well can't be all fun and games I suppose.


Tuesday 10 April 2012

Spring laziness

I just realised its high time to sit on me arse and start working seriously. I got so much stuff literally lying around in some half finished state. Pic very related - its my chainmail tie. I found it just lying around burred in the clutter, and its been like that since, I don't know...last summer?


My university studies are also lagging behind which is a more pressing concern. While the piles of stuff/trash/tools are a annoying only my mother, the latter can have more serious consequences.

Sunday 8 April 2012

4 in 1 japanese chainmail

Been a while since I made one of these clips :)

Right

4in1 japanese chainmail armour is quite simple, you can't really make a mistake in it. It lacks the density and strength of 4in1 european chain. On the other hand its lighter, and quite easy and fast to produce.
You can use one, or two types of links depending on preferances.

Here is several variants(one of them is from the video)


4в1 японска ризница

Японската разновидност на стандартната 4в1.

Съвсем лесна за направа, няма какво много да и се сбърка.
По рехава и оттам и не толкова здрава като европейска ризница 4в1.


Може да се прави както от еднакви, така и от два вида халки.

3 отделни варианта(единия е от клипа)


Saturday 7 April 2012

Drunkethics is 1(one) year old.

I just realised that this blog is now more than 1 year old. I started it last Spring by the end of March.

All in all, I'd say we are doing quite well so far. I mean come on - we got awesome legos, awesome videos, awesome golden bikini and whatnot. And I got plenty of works in progress like the lego chainmail below, so future updates will be coming.

Otherwise - life goes on. University is coming to an end. The world MIGHT be coming to an end as well since december 2012 isn't so far now. I dunno. We'll see about that when we get there. Stay tuned for more of my stuff if you like it.

Thursday 5 April 2012

Lego armor version 3 WIP

Version 3 of my lego chainmail armor. Its made with custom homemade rings which i winded myself and cut with a nail clipper. Its still a work in progress. I finished about 2/3of it.


The home made custom links are much, much smaller. Now it looks like a proper chainmaille suit for the lego mini fig. However its much harder to weave it.The links are so tiny I can barely see what I'm doing there, and they are very easy to damage. Not saying its impossible ofc, but its quite hard.


 Here you can see it in comparison to the old lego chainmaille. The new links are small enough to fit inside the old ones.


Saturday 31 March 2012

Minecraft spider pendant

Phew, now I'm not dead, don't worry. A lot of my projects are slowly progressing, and real life is rearing its ugly head. Anyway, ever since I saw the model and made my first minecraft spider, I wanted to make another one - this time in the proper colours. During my last visit to the store where I buy supplies, I finally got properly tinted parts.

Aaaand here it is - the minecraft spider. I tried to make is as close as possible to the original, but well, i was still limited by the parts. Took me just a few minutes to make it.

 You know that feel when you finally got some lapus lazuli and happily try to get it to your home only to have a spider drop on your head? We know it too. 

Oh yeah - I kinda botched the eyes - should have used acrylic paints, but that's quick and easy to fix.

Front view.

Side view
 Rear on 3/4


Here you can see it worn around the neck

  I might add a drop of glue to the center to fix the legs from moving, but that's it. Next I'm going to make a properly tinted cave spider.

Tuesday 20 March 2012

Home brewed Mead - recipe 1

Right assuming we all got our chainmail and our round shields set all that is left is to find some wenches and something proper to drink. Now  - beer is the obvious first choice but hardly the only one - if you are willing - you can try brewing mead.

There are many recipes depending on what exactly do you want to get for your final product, I will write down as many as I can find here in a series of posts, detailing their differences in flavour, taste, ingredients and making.

One thing that rings true for all of them is that this will be a long term investment - brewing will take several months, so you should also consider making a sizeable batch  too. It will also require a few things you may have a better luck finding in your granma's cellar - namely the jugs.

Now without further ado - home made mead recipe number 1
   
Ingredients :
8-10 lbs pure honey for light, delicate Mead or 12-13 for medium sweet Mead or
15-16 lbs for very sweet or alcoholic Mead.
4-5 gallons purified spring water (not distilled)
3 tablespoons of yeast nutrient (or 5 tablets)
1 tablespoon acid blend (combination malic/citric acid)
5-7 oz. sliced fresh ginger root (1 finger's length)

POSSIBLE EXTRAS - just for spicing it up
1/4 tablespoon fresh rosemary
5-6 whole cloves
lime/orange peels
1-2 vanilla beans
cinnamon/nutmeg
crushed fruit (peaches, strawberries, grapes, blueberries - you can experiment yourself here)
1 tablespoon Irish Moss to clarify Mead
OR
1/2 tablespoon clear gelatin to clarify Mead
1 packet of yeast - either champagne or ale yeast.

Heat The water for 10-15 minutes until its boiling. Then stir in honey, yeast
nutrients, acid blend, and whatever spices you picked ( ginger, vanilla, cinnamon,
nutmeg, etc.). The  mix stays like that for another 10-15 minutes,
(overcooking removes too much honey flavour so you can turn down the heat ). Skim off the foam as needed
should be 2-3 times. After 15 minutes, add Irish
Moss or clear gelatin to clarify the mead. After last skimming, turn off the heat,
add crushed fruit if you want to, and let it steep 15-30 minutes while allowing the mead to
cool and clarify. After it begins to clear, strain off the fruit with
hand skimmer and pour the mead through strainer funnel into a 5 gallon glass
carboy jug. Let it cool down to room temperature for about 24h.
After 24h warm up 1 cup of mead(microwave works for this), stir in 1 packet of yeast - its important what you picked as
it will affect the final product and leave it for 5-15 min to allow the yeast to start working.
Add the mead/yeast mix to the jug and swirl it around.

Place run-off tube in stopper of bottle, with other end of tube in large
bowl or bottle to capture "blow-off" froth. Let mead sit undisturbed 7
days in cool, dark area. After initial violent fermenting slows down
and mead begins to settle, rack off (siphon off) good mead into clean
sterilized jug, leaving all sediment in bottom of first jug. Attach
airlock to this secondary carboy. After 4-6 months, mead will clear.
During this time, if more sediment forms on bottom, good mead can be
racked off again to another clean sterilized jug.
When you are bottling in order to add carbonation you can put a quarter of a tablespoon of white sugar per 12 oz.
or stir in 1/2 to 1 lb raw honey per 5 gallons of mead(dissolve it first with mead or pure water)


Share

Twitter Delicious Facebook Digg Stumbleupon Favorites